Bài 12: Navigator và Routing
Như chúng ta đã biết, trong Flutter những gì chúng ta nhìn thấy được gọi là các widget. Navigator cũng là một widget có chức năng quản lý các trang của ứng dụng theo định dạng giống như ngăn xếp. Trong bất kì ứng dụng nào, việc điều hướng từ một Full-screen ( page/screen ) để làm một công việc xác định nào đó ( chuyển sang một Full-screen khác) sử dụng Navigator widget thì được gọi là Routing. Flutter cung cấp cho chúng ta lớp Routing cơ bản - MaterialPageRoute với hai phương thức - Navigator.push và Navigator.pop . Hôm nay chúng ta hãy cùng nhau tìm hiểu kĩ về chức năng không thể thiểu trong lập trình Flutter này nhé !
MaterialPageRoute
Đây là một widget được sử dụng để render giao diện người dùng nhằm thay thế toàn bộ màn hình với một hiệu ứng chuyển đặc biệt nào đó
Tại đây, hàm buider sẽ chấp nhận chức năng để xây dựng nội dung bằng cách thay thế context hiện tại của ứng dụng
MaterialPageRoute(builder: (context) => Widget())Navigation.push
Từ một màn hình bất kì, ta muốn chuyển sang một màn hình khác sử dụng MaterialPageRoute widget như sau :
Navigator.push( context, MaterialPageRoute(builder: (context) => Widget()), );Navigation.pop
Được sử dụng để quay về trang trước, các sử dụng đơn giản như sau :
Navigator.pop(context);Để hiểu sâu hơn về Navigator chúng ta sẽ bắt tay vào xây dựng một ứng dụng đơn giản;. Let get started !!!
Tạo một ứng dụng Flutte mới với tên bất kì bạn muốn.Hãy copy thư mục assets từ product_nav_app sang product_state_app và thêm assets vào file pubspec.yaml.( Hoặc các bạn có thể qua bài học này để lấy hình ảnh nhé https://vncoder.vn/bai-hoc/layout-trong-flutter-225)
assets:
   - assets/floppydisk.jpg
   - assets/iphone.jpg
   - assets/laptop.jpg
   - assets/pendrive.jpg
   - assets/pixel.jpg
   - assets/tablet.jpg
Thay thế hàm main.dart mặc định bằng hàm main dưới đây
import 'package:flutter/material.dart';
void main() => runApp(MyApp());

class MyApp extends StatelessWidget {
   // This widget is the root of your application.
   @override
   Widget build(BuildContext context) {
      return MaterialApp(
         title: 'Flutter Demo',
         theme: ThemeData(
            primarySwatch: Colors.blue,
         ),
         home: MyHomePage(
            title: 'Product state demo home page'
         ),
      );
   }
}
class MyHomePage extends StatelessWidget {
   MyHomePage({Key key, this.title}) : super(key: key);
   final String title;
   @override
   Widget build(BuildContext context) {
      return Scaffold(
         appBar: AppBar(
            title: Text(this.title),
         ),
         body: Center(
            child: Text('Hello World',)
         ),
      );
   }
}
Tiếp theo chúng ta sẽ tạo một lớp Product như sau :
class Product {
   final String name;
   final String description;
   final int price;
   final String image;
   Product(this.name, this.description, this.price, this.image);
}
Tiếp đến chúng ta sẽ tạo phương thức getProduct từ lớp Product
import product.dart in main.dart
import 'Product.dart
static List<Product> getProducts() {
   List<Product> items = <Product>[];

   items.add(
      Product(
         "Pixel",
         "Pixel is the most feature-full phone ever", 800,
         "pixel.png"
      )
   );
   items.add(
      Product(
         "Laptop",
         "Laptop is most productive development tool",
         2000, "
         laptop.png"
      )
   );
   items.add(
      Product(
         "Tablet",
         "Tablet is the most useful device ever for meeting",
         1500,
         "tablet.png"
      )
   );
   items.add(
      Product(
         "Pendrive",
         "Pendrive is useful storage medium",
         100,
         "pendrive.png"
      )
   );
   items.add(
      Product(
         "Floppy Drive",
         "Floppy drive is useful rescue storage medium",
         20,
         "floppy.png"
      )
   );
   return items;
}
';
Bây giờ chúng ta sẽ tạo một widget mới có tên là RatingBox dùng để đánh giá sản phẩm.
class RatingBox extends StatefulWidget {
   @override
   _RatingBoxState createState() =>_RatingBoxState();
}
class _RatingBoxState extends State<RatingBox> {
   int _rating = 0;
   void _setRatingAsOne() {
      setState(() {
         _rating = 1;
      });
   }
   void _setRatingAsTwo() {
      setState(() {
         _rating = 2;
      });
   }
   void _setRatingAsThree() {
      setState(() {
         _rating = 3;
      });
   }
   Widget build(BuildContext context) {
      double _size = 20;
      print(_rating);
      return Row(
         mainAxisAlignment: MainAxisAlignment.end,
         crossAxisAlignment: CrossAxisAlignment.end,
         mainAxisSize: MainAxisSize.max,
         children: <Widget>[
            Container(
               padding: EdgeInsets.all(0),
               child: IconButton(
                  icon: (
                     _rating >= 1?
                     Icon(
                        Icons.star,
                        size: _size,
                     )
                     : Icon(
                        Icons.star_border,
                        size: _size,
                     )
                  ),
                  color: Colors.red[500],
                  onPressed: _setRatingAsOne,
                  iconSize: _size,
               ),
            ),
            Container(
               padding: EdgeInsets.all(0),
               child: IconButton(
                  icon: (
                     _rating >= 2?
                     Icon(
                        Icons.star,
                        size: _size,
                     )
                     : Icon(
                        Icons.star_border,
                        size: _size,
                     )
                  ),
                  color: Colors.red[500],
                  onPressed: _setRatingAsTwo,
                  iconSize: _size,
               ),
            ),
            Container(
               padding: EdgeInsets.all(0),
               child: IconButton(
                  icon: (
                     _rating >= 3 ?
                     Icon(
                        Icons.star,
                        size: _size,
                     )
                     : Icon(
                        Icons.star_border,
                        size: _size,
                     )
                  ),
                  color: Colors.red[500],
                  onPressed: _setRatingAsThree,
                  iconSize: _size,
               ),
            ),
         ],
      );
   }
}
Chúng ta sẽ tạo một ProductBox widget là một item trong list Product dùng để hiển thị thông tin và đánh giá sản phẩm.
class ProductBox extends StatelessWidget {
ProductBox({Key key, this.item}) : super(key: key);
final Product item;
Widget build(BuildContext context) {
return Container(
padding: EdgeInsets.all(2),
height: 140,
child: Card(
child: Row(
mainAxisAlignment: MainAxisAlignment.spaceEvenly,
children: <Widget>[
Image.asset("assets/appimages/" + this.item.image),
Expanded(
child: Container(
padding: EdgeInsets.all(5),
child: Column(
mainAxisAlignment: MainAxisAlignment.spaceEvenly,
children: <Widget>[
Text(this.item.name,
style: TextStyle(fontWeight: FontWeight.bold)),
Text(this.item.description),
Text("Price: " + this.item.price.toString()),
RatingBox(),
],
)
)
)
]
),
)
);
}
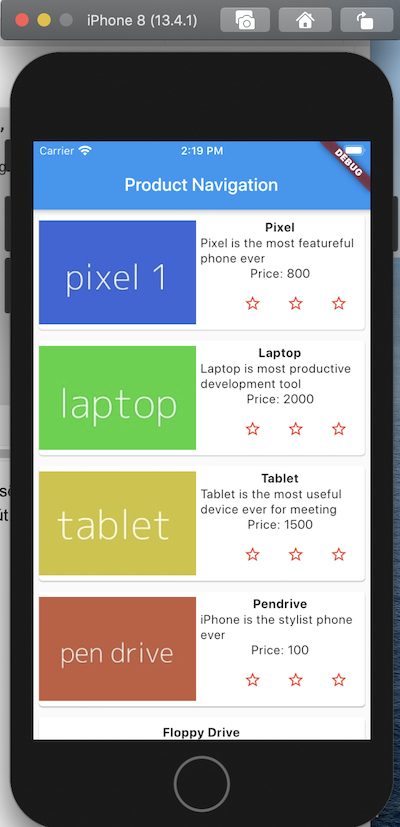
}Tiếp tục, ta sẽ viết hàm có tên là MyHomePage widget để hiển thị toàn bộ danh sách Product và ta sẽ xử dụng ListView.
class MyHomePage extends StatelessWidget {
MyHomePage({Key key, this.title}) : super(key: key);
final String title;
final items = Product.getProducts();
@override
Widget build(BuildContext context) {
return Scaffold( appBar: AppBar(title: Text("Product Navigation")),
body: ListView.builder(
itemCount: items.length,
itemBuilder: (context, index) {
return GestureDetector(
child: ProductBox(item: items[index]),
onTap: () {
Navigator.push(
context, MaterialPageRoute(
builder: (context) => ProductPage(item: items[index]),
),
);
},
);
},
));
}
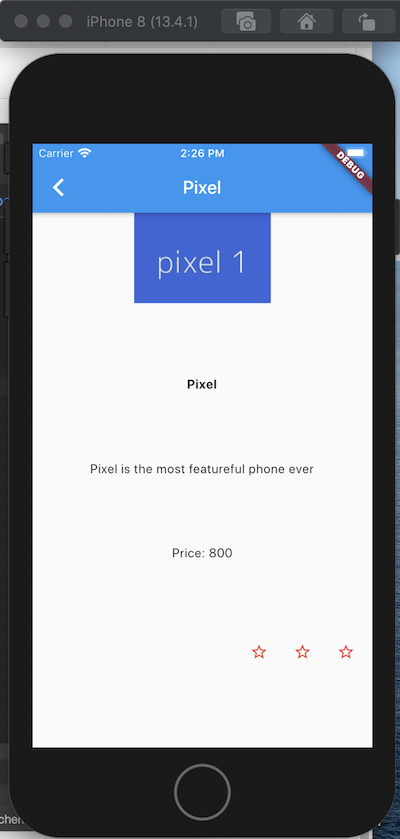
}OKE, bây giờ là phần quan trọng trong bài hôm nay. Bây giờ chúng ta sẽ sử dụng MaterialPageRoute để chuyển sang screen chi tiết sản phẩm nhé.
class ProductPage extends StatelessWidget {
   ProductPage({Key key, this.item}) : super(key: key);
   final Product item;

   @override
   Widget build(BuildContext context) {
      return Scaffold(
         appBar: AppBar(
            title: Text(this.item.name),
         ),
         body: Center(
            child: Container(
               padding: EdgeInsets.all(0),
               child: Column(
                  mainAxisAlignment: MainAxisAlignment.start,
                  crossAxisAlignment: CrossAxisAlignment.start,
                  children: <Widget>[
                     Image.asset("assets/appimages/" + this.item.image),
                     Expanded(
                        child: Container(
                           padding: EdgeInsets.all(5),
                           child: Column(
                              mainAxisAlignment: MainAxisAlignment.spaceEvenly,
                              children: <Widget>[
                                 Text(
                                    this.item.name, style: TextStyle(
                                       fontWeight: FontWeight.bold
                                    )
                                 ),
                                 Text(this.item.description),
                                 Text("Price: " + this.item.price.toString()),
                                 RatingBox(),
                              ],
                           )
                        )
                     )
                  ]
               ),
            ),
         ),
      );
   }
}
Và chúng ta đã hoàn thành, dưới đây là toàn bộ code trong ứng dụng.
import 'package:flutter/material.dart';
void main() => runApp(MyApp());

class Product {
  final String name;
  final String description;
  final int price;
  final String image;
  Product(this.name, this.description, this.price, this.image);

  static List<Product> getProducts() {
    List<Product> items = <Product>[];
    items.add(
        Product(
            "Pixel",
            "Pixel is the most featureful phone ever",
            800,
            "pixel.jpg"
        )
    );
    items.add(
        Product(
            "Laptop",
            "Laptop is most productive development tool",
            2000,
            "laptop.jpg"
        )
    );
    items.add(
        Product(
            "Tablet",
            "Tablet is the most useful device ever for meeting",
            1500,
            "tablet.jpg"
        )
    );
    items.add(
        Product(
            "Pendrive",
            "iPhone is the stylist phone ever",
            100,
            "pendrive.jpg"
        )
    );
    items.add(
        Product(
            "Floppy Drive",
            "iPhone is the stylist phone ever",
            20,
            "floppydrive.jpg"
        )
    );
    items.add(
        Product(
            "iPhone",
            "iPhone is the stylist phone ever",
            1000,
            "iphone.jpg"
        )
    );
    return items;
  }
}
class MyApp extends StatelessWidget {
  // This widget is the root of your application.
  @override
  Widget build(BuildContext context) {
    return MaterialApp(
      title: 'Flutter Demo',
      theme: ThemeData(
        primarySwatch: Colors.blue,
      ),
      home: MyHomePage(title: 'Product Navigation demo home page'),
    );
  }
}
class MyHomePage extends StatelessWidget {
  MyHomePage({Key key, this.title}) : super(key: key);
  final String title;
  final items = Product.getProducts();

  @override
  Widget build(BuildContext context) {
    return Scaffold(
        appBar: AppBar(title: Text("Product Navigation")),
        body: ListView.builder(
          itemCount: items.length,
          itemBuilder: (context, index) {
            return GestureDetector(
              child: ProductBox(item: items[index]),
              onTap: () {
                Navigator.push(
                  context,
                  MaterialPageRoute(
                    builder: (context) => ProductPage(item: items[index]),
                  ),
                );
              },
            );
          },
        )
    );
  }
}
class ProductPage extends StatelessWidget {
  ProductPage({Key key, this.item}) : super(key: key);
  final Product item;

  @override
  Widget build(BuildContext context) {
    return Scaffold(
      appBar: AppBar(
        title: Text(this.item.name),
      ),
      body: Center(
        child: Container(
          padding: EdgeInsets.all(0),
          child: Column(
              mainAxisAlignment: MainAxisAlignment.start,
              crossAxisAlignment: CrossAxisAlignment.start,
              children: <Widget>[
                Image.asset("assets/" + this.item.image,height: 100.0,width: MediaQuery.of(context).size.width,),
                Expanded(
                    child: Container(
                        padding: EdgeInsets.all(5),
                        child: Column(
                          mainAxisAlignment: MainAxisAlignment.spaceEvenly,
                          children: <Widget>[
                            Text(this.item.name, style: TextStyle(fontWeight: FontWeight.bold)),
                            Text(this.item.description),
                            Text("Price: " + this.item.price.toString()),
                            RatingBox(),
                          ],
                        )
                    )
                )
              ]
          ),
        ),
      ),
    );
  }
}
class RatingBox extends StatefulWidget {
  @override
  _RatingBoxState createState() => _RatingBoxState();
}
class _RatingBoxState extends State<RatingBox> {
  int _rating = 0;
  void _setRatingAsOne() {
    setState(() {
      _rating = 1;
    });
  }
  void _setRatingAsTwo() {
    setState(() {
      _rating = 2;
    });
  }
  void _setRatingAsThree() {
    setState(() {
      _rating = 3;
    });
  }
  Widget build(BuildContext context) {
    double _size = 20;
    print(_rating);
    return Row(
      mainAxisAlignment: MainAxisAlignment.end,
      crossAxisAlignment: CrossAxisAlignment.end,
      mainAxisSize: MainAxisSize.max,
      children: <Widget>[
        Container(
          padding: EdgeInsets.all(0),
          child: IconButton(
            icon: (
                _rating >= 1 ? Icon(
                  Icons.star,
                  size: _size,
                )
                    : Icon(
                  Icons.star_border,
                  size: _size,
                )
            ),
            color: Colors.red[500],
            onPressed: _setRatingAsOne,
            iconSize: _size,
          ),
        ),
        Container(
          padding: EdgeInsets.all(0),
          child: IconButton(
            icon: (
                _rating >= 2 ?
                Icon(
                  Icons.star,
                  size: _size,
                )
                    : Icon(
                  Icons.star_border,
                  size: _size,
                )
            ),
            color: Colors.red[500],
            onPressed: _setRatingAsTwo,
            iconSize: _size,
          ),
        ),
        Container(
          padding: EdgeInsets.all(0),
          child: IconButton(
            icon: (
                _rating >= 3 ?
                Icon(
                  Icons.star,
                  size: _size,
                )
                    : Icon(
                  Icons.star_border,
                  size: _size,
                )
            ),
            color: Colors.red[500],
            onPressed: _setRatingAsThree,
            iconSize: _size,
          ),
        ),
      ],
    );
  }
}
class ProductBox extends StatelessWidget {
  ProductBox({Key key, this.item}) : super(key: key);
  final Product item;

  Widget build(BuildContext context) {
    return Container(
        padding: EdgeInsets.all(2),
        height: 140,
        child: Card(
          child: Row(
              mainAxisAlignment: MainAxisAlignment.spaceEvenly,
              children: <Widget>[
                Image.asset("assets/" + this.item.image),
                Expanded(
                    child: Container(
                        padding: EdgeInsets.all(5),
                        child: Column(
                          mainAxisAlignment: MainAxisAlignment.spaceEvenly,
                          children: <Widget>[
                            Text(this.item.name, style: TextStyle(fontWeight: FontWeight.bold)), Text(this.item.description),
                            Text("Price: " + this.item.price.toString()),
                            RatingBox(),
                          ],
                        )
                    )
                )
              ]
          ),
        )
    );
  }
}
Sau khi hoàn thành, chúng ta sẽ run ứng dụng lên và click vào bất kì Product item nào, nó sẽ hiển thị các trang chi tiết về sản phẩm liên quan và chúng ta có thể trở về màn hình HomePage bằng cách nhấn vào nút quay lại. Dưới đây là hình ảnh để các bạn có thể dễ dàng quan sát hơn
Như vậy hôm nay chúng ta đã tìm hiểu cơ bản các khái niệm về Navigator , Routing và biết cách triển khai nó. Cảm ơn các bạn đã theo dõi và chúc các bạn học tốt